2026-10-25
How Do You Conduct an Initial Balcony Safety Audit?
Run a balcony safety audit with a 12-point checklist and photo log, then learn how to spot hidden risks and when a licensed inspector is needed.
Last Updated: October 24, 2026
Quick Summary
To conduct an initial balcony safety audit, walk every balcony, deck, walkway, stairway, landing, and platform and record visible cracks, rot, corrosion, loose connections, and drainage trouble spots with photos and notes. This balcony safety audit is a triage tool done by board members or staff, not an inspection, so escalate red flags to a licensed inspector.
- Record each element as OK, Monitor, or Escalate, and stop and call a licensed inspector for any Escalate item.
- Check corner railing posts first, since they often fail before interior posts by taking wind load from two directions.
- A firm hand push from a standing position is the limit; never load-test a railing or lean over an edge.
- Name photos building-element-date-sequence and pair a wide shot with a close-up for each finding.
- Re-run the full audit once a year and re-check railing firmness every quarter.
Table of Contents
- What an Initial Balcony Safety Audit Covers (and What It Doesn’t)
- Balcony Inspection Checklist: What to Look At Element by Element
- Signs of Balcony Structural Damage You Should Never Ignore
- How to Inspect Hard-to-See Areas Without Getting Hurt
- Building a Balcony Inspection Report with Photos and a Reusable Record
- Sorting Findings by Risk: What to Fix Now, Soon, and Later
- Balcony Maintenance Checklist for the Months After the Audit
- When to Bring in a Licensed Inspector or Reserve Study Provider
- Turn Your Audit Findings into a Board-Ready Plan
What an Initial Balcony Safety Audit Covers (and What It Doesn’t)
A balcony safety audit is a structured visual review of the exterior elevated elements your association is responsible for, done by board members or staff to spot problems early and document them. The audit is the cheap, fast front end of that process.
Here’s the core tension most guides miss: an initial audit is not an inspection. It’s a triage tool. It tells you where to look harder and what to fix now. It does not certify anything, and it does not satisfy a legal inspection requirement.
What a board-level audit covers:
- A walk-through of every balcony, deck, walkway, stairway, landing, and platform
- Photos and notes on visible cracks, rot, corrosion, and loose connections
- A first pass at drainage and waterproofing trouble spots
- A risk ranking so the board knows what needs money first
What it does not cover: concealed framing, load calculations, structural engineering judgment, or any formal inspection certificate. Keep that line clear from day one.
Where a Volunteer Audit Stops and a Licensed Inspector Begins
The line is simple: volunteers document what they can see safely from a standing position. Licensed professionals assess what they can’t.
Stop and call in a qualified inspector when you find any of these:
- Cracks wider than a hairline in concrete or stucco
- Sagging or deflection in a walking surface
- Rust bleeding from connections or fasteners
- Soft, spongy, or crumbling wood
- A railing that moves when pushed
Your audit notes feed directly into the formal process. For associations in California, the legal requirements that define a licensed inspector’s scope are set out in SB 326 balcony inspection requirements, which explains deadlines, checklists, and HOA liability. Read that before you schedule anything paid.
Balcony Inspection Checklist: What to Look At Element by Element
A balcony inspection checklist works best when you move in a fixed order, element by element, so nothing gets skipped between buildings. Use the same sequence every time and your notes stay comparable year to year. The checklist below is written for a non-expert doing a preliminary visual audit from a safe standing position, it tells you what to look at, what a normal condition looks like, and the point at which you stop observing and call a qualified professional.
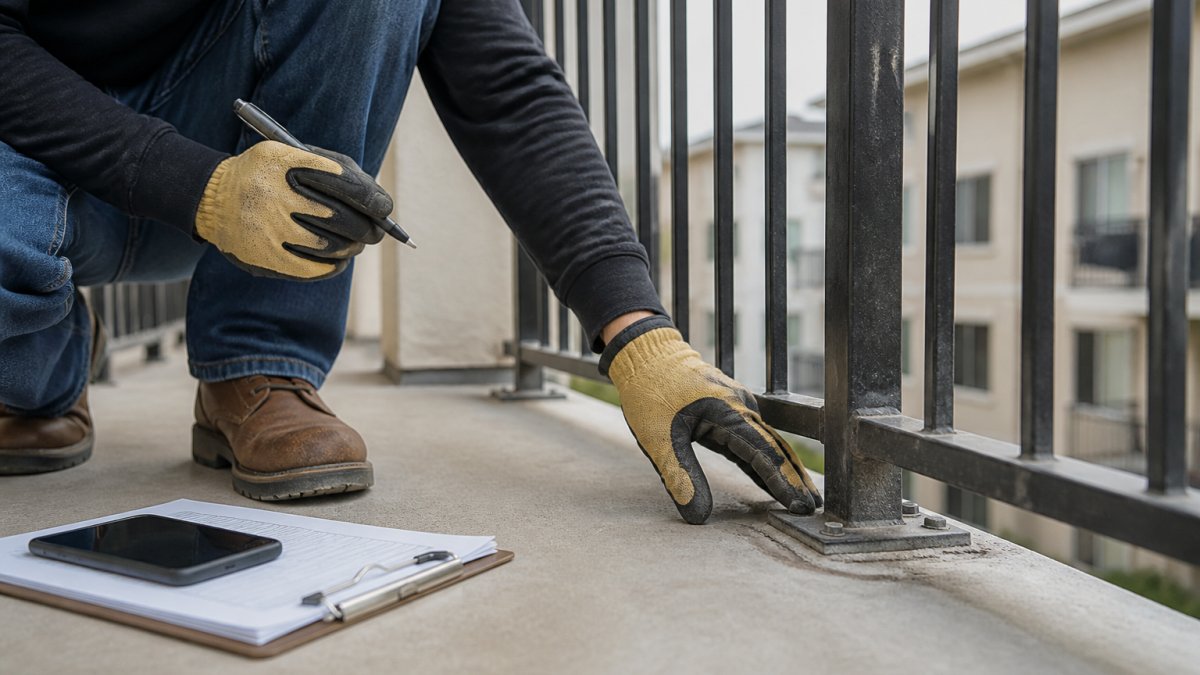
Start at the top and work down. For each element, record one of three states: OK (no action), Monitor (note it, re-check next audit), or Escalate (stop, restrict access if needed, call a licensed inspector).
- Railings and guardrails: height, wobble, loose posts, missing infill
- Connections: base plates, bolts, brackets, welds
- Walking surface: cracks, lifting, soft spots, ponding water
- Edges and thresholds: gaps, separation, sealant failure
- Drainage: scuppers, drains, staining, standing water
- Below the deck: staining, efflorescence, visible movement
Railings, Guardrails, and Load-Bearing Connections
Grab the railing and push it firmly in several directions, but only from a standing position on the balcony, never by leaning over the edge. A railing that flexes, rattles, or shows movement at the base is a load-bearing concern, not a cosmetic one. Check every post, not just the first one.
What to record for railings and connections:
- Wobble or flex: any movement at the base plate or post is an Escalate finding.
- Missing or loose infill: gaps in balusters or panels that a 4-inch sphere could pass through are a fall hazard, Escalate.
- Corrosion: rust streaks, white powder (efflorescence), or cracked welds at the base plate, Monitor if surface-only, Escalate if metal is pitted or flaking.
- Fasteners: loose bolts, missing nuts, or brackets pulling away from the wall, Escalate.
Look closely at where metal meets concrete or wood. Rust streaks, cracked welds, and loose bolts are the earliest signs of a failing connection. Note the location of each one precisely, because “somewhere on building C” helps nobody later. A common pattern is for the first post at a corner to fail before the interior posts, because it takes wind load from two directions, check corners first.
Warning: Do not load-test a railing by hanging weight on it, climbing it, or pushing with your full body weight. A firm hand push from a standing position is the limit of what a volunteer should do. If the railing moves under that push, stop and escalate.
Walking Surfaces, Drainage, and Waterproofing Details
Water is the enemy of every balcony. Walk the surface after rain if you can, and watch where water sits instead of draining. A surface that ponds for more than a few hours after rain is telling you the slope or the drain is failing.
Check for:
- Ponding water that lingers hours after rain, Monitor if shallow and draining, Escalate if standing water is deeper than about a quarter inch or reaches the wall.
- Cracked or peeling sealant at joints and edges, Monitor; re-seal at the next maintenance window.
- Lifted or blistered waterproofing membrane, Escalate; this is a direct path for water under the deck.
- Failed flashing where the deck meets the wall, Escalate if you can see separation or rust staining below it.
- Staining or efflorescence on the underside or at the wall line, Monitor if faint, Escalate if it is active (wet to the touch or spreading).
- Soft or spongy walking surface, Escalate immediately; do not step on it again.
Any of these points to water intrusion, which is the single most common path to structural deterioration in elevated elements. A visual audit cannot confirm whether water has reached concealed framing, note that limitation in your record and flag it for professional assessment.
What a Volunteer Can and Cannot Judge
The checklist above is a triage tool, not an engineering assessment. Keep the boundary clear:
- You can judge: visible cracks, rust staining, loose fasteners, ponding, sealant condition, railing wobble under a hand push.
- You cannot judge: crack depth or cause, concealed framing condition, connection capacity, load capacity, or whether a repair meets code.
- Stop and call a licensed professional when you find any Escalate item, when you cannot see a connection safely, or when two or more Monitor items appear on the same element.
Your audit notes feed directly into the formal process. For associations in California, the legal requirements that define a licensed inspector’s scope are set out in SB 326 balcony inspection requirements, which explains deadlines, checklists, and HOA liability. Read that before you schedule anything paid.
Signs of Balcony Structural Damage You Should Never Ignore
The signs of balcony structural damage fall into a short list of red flags that should trigger an immediate stop, a barricade, and a call to a licensed professional. Treat these as non-negotiable.
- Visible deflection or sagging in the deck
- Cracks that are widening or have rust staining
- Rot, decay, or crumbling wood framing
- Corrosion on bolts, brackets, or reinforcing steel
- Loose or separating connections at the wall
- A railing that fails a firm push test
When you see any of these, close the balcony. Do not wait for the next board meeting. Document the condition with photos and a written note, then escalate.
How to Inspect Hard-to-See Areas Without Getting Hurt
You inspect hard-to-see areas with tools that extend your reach, not with your body. No board member should climb a railing, lean over an edge, or step onto a roof to get a better look.
Safe ways to see more:
- Use binoculars from the ground to check upper balconies
- Use a phone camera on a selfie stick to photograph undersides
- Shine a strong flashlight into gaps and behind fascia
- Photograph from below to catch staining and movement
- Ask a resident for interior access where a wall meets a deck
Watch out: leaning over a railing to photograph a connection below is how volunteers get hurt. If you can’t see it safely, note it as “requires professional access” and move on.
Building a Balcony Inspection Report with Photos and a Reusable Record
A balcony inspection report is only useful if the next person can pick it up and understand it without asking you questions. Build it as a simple, repeatable record, a photo log plus a one-page findings table, so this year’s audit becomes next year’s baseline instead of a blank page.
The Photo Log: One Folder, One Naming Pattern
Store every photo in a single shared folder with a consistent naming pattern: building-element-date-sequence. For example, B2-railing-baseplate-2026-10-24-01.jpg. That pattern lets anyone sort by building or by element and find the history of a defect in seconds.
For each finding, capture two photos:
- A wide shot that shows the element in context (which balcony, which corner, which wall).
- A close-up that shows the defect clearly, with a coin, tape measure, or gloved hand for scale where safe.
Label each photo in the file name and in the report with the building, unit or elevation, element, and date. A photo without a location label is nearly useless six months later.
The Findings Table: Severity Ratings That Drive Action
Use a three-level severity scale that maps directly to a response, so the board does not have to interpret your notes:
| Severity | What It Looks Like | Required Response |
|---|---|---|
| Critical | Deflection, widening cracks, loose railing, rot, active water intrusion | Restrict access, notify management same day, call a licensed inspector |
| Moderate | Ponding water, failed sealant, surface cracks, faint staining | Schedule repair this budget cycle; re-check at next audit |
| Low | Cosmetic staining, minor wear, paint issues | Add to maintenance list; monitor |
For each row in the findings table, capture:
- Building, unit, and element location
- Date and inspector name
- Photo file names (wide and close-up)
- A short description in plain language (“rust staining at base plate, corner post, Building 2, Unit 204”)
- Severity rating
- Recommended next step and owner
Tip: Write descriptions in plain language a homeowner can understand. “Rust bleeding from the base plate” is better than “corrosion at the connection interface”, the board has to explain this to residents, and plain language travels further.
A Sample Record You Can Copy
A single finding in the table might read:
Building 2, Unit 204, corner railing base plate, 2026-10-24, Inspector: J. Rivera, Photos:
B2-railing-baseplate-2026-10-24-01.jpg(wide),...-02.jpg(close-up), Rust staining and slight movement at base plate under hand push. Critical. Restrict access to balcony, notify management, call licensed inspector. Owner: board president.
That one row gives the next inspector, the board, and any professional everything they need without a phone call.
Communicating Findings Without Causing Panic
Documentation is also a communication tool. A common pattern is for boards to sit on findings until the next meeting, then surprise residents with a special assessment. Avoid that by separating the record into two views:
- The full findings table for the board and any professional, every row, every severity.
- A one-page summary for residents, only the Critical and Moderate items, with the action already underway and the date of the next update.
Keep the log with the audit record. Over time, it becomes the evidence trail the board needs, and the proof that the association acted promptly when a defect was first observed. If you want a deeper method for structured component reviews, this guide on how to conduct an HOA reserve component site inspection walks through the full process.
Sorting Findings by Risk: What to Fix Now, Soon, and Later
Sort every finding into three buckets before the board meets. This is where a good audit saves real money, because it stops the board from treating a cosmetic crack the same as a failing connection.
| Priority | What It Looks Like | Response |
|---|---|---|
| Fix now | Deflection, widening cracks, loose railing, rot | Barricade, call a licensed inspector |
| Fix soon | Ponding water, failed sealant, surface cracks | Schedule repair this budget cycle |
| Fix later | Cosmetic staining, minor wear, paint issues | Add to maintenance list and monitor |
The rule we give boards: if a finding affects structural safety or could let water in, it moves up. Everything else can wait its turn.
Balcony Maintenance Checklist for the Months After the Audit
A balcony maintenance checklist turns audit findings into routine work, so small issues never grow into special assessments. Assign each item an owner and a season.
- Clear drains and scuppers before and during rainy season
- Reapply sealant at joints and edges annually
- Wash surfaces to spot new cracks early
- Re-check railing firmness every quarter
- Photograph known trouble spots on a set schedule
- Log every repair with date and cost
- Re-run the full audit once a year
Keep the log with the audit record. Over time, it becomes the evidence trail the board needs.
When to Bring in a Licensed Inspector or Reserve Study Provider
Bring in a licensed inspector the moment your audit turns up a safety red flag, and bring in a reserve study provider when the findings start pointing at real money. Those are two different triggers, and boards often confuse them.
For the formal elevated-element process, this SB 326 elevated element inspection guide for HOAs covers deadlines, inspector criteria, and costs. If you need to engage a provider for the broader funding picture, this guide on how to hire a qualified reserve study provider explains how to vet one.
A reserve study provider takes your audit findings and turns them into a funded, multi-year plan. That’s the bridge from “we found problems” to “here’s how we pay for them.”
Turn Your Audit Findings into a Board-Ready Plan
Your audit is finished. Now the board needs a plan it can vote on, fund, and explain to homeowners in plain language.
At Apex Reserve Study, we build Davis-Stirling compliant reserve studies for condo associations, with integrated SB 326/721 elevated-element planning so audit findings and funding live in one report. Our process is predictable: a one-day quote response, fixed timelines with no surprises, and board-ready reports written so homeowners actually understand them. If your findings include deferred work, this guide on managing HOA deferred maintenance with reserve funds shows how to fund it without a shock assessment.
Frequently Asked Questions
Does a visual balcony safety audit replace a professional inspection?
No. A visual balcony safety audit is a screening tool that helps an owner or board spot obvious problems and document conditions between professional inspections. It does not confirm the structural capacity of load-bearing components, and it cannot satisfy statutory inspection requirements. A licensed professional still needs to examine exterior elevated elements, waterproofing, and connections. Use the audit to organize findings and prioritize what a qualified inspector should review first.
What are the warning signs that a balcony should be closed off immediately?
Close the balcony and restrict access when you see movement or springiness underfoot, a railing that flexes or pulls away from the wall, large or widening cracks in the slab or supports, visible rot or crumbling concrete around connections, or water pooling that never drains. Any single one of these is an immediate safety concern. Barricade the area, note the date and condition in your record, and contact a licensed professional before anyone uses the balcony again.
How often should balconies and elevated elements be audited?
Run a visual walkthrough at least once a year and after any major storm, and repeat it whenever a homeowner reports a concern. Professional inspection intervals are set by state and local rules, so confirm the schedule that applies to your building. A recurring calendar entry, a photo record from each pass, and a short written note of what changed make the yearly audit quick and give your board a defensible history of care.
What should a balcony inspection report include?
A useful balcony inspection report lists each balcony or elevated element by location, the date and time of the review, who performed it, and what was observed. Attach dated photos of every defect, note whether the issue is cosmetic or a possible safety concern, and record the recommended corrective action and who owns it. Keep a copy with your maintenance records so a licensed inspector or reserve study provider can pick up where your audit left off.
Most boards sit on audit findings for months because nobody knows what to do next. Get started with Apex Reserve Study and turn your balcony findings into a clear, funded plan your homeowners can trust.
Need a Reserve Study?
Get a free quote for your California HOA or condo association. We respond within 1 business day.
Get Your Free Quote