2026-10-17
Structural Issues in SB 721 Inspections
Learn the most common structural defects found during SB 721 inspections, what they mean for safety, and how to prepare your community for compliance.
Table of Contents
- What SB 721 Requires and Which Buildings Are Covered
- Common Structural Issues Found in SB 721 Inspections
- SB 721 Balcony Inspection Checklist: What Inspectors Look For
- SB 721 Inspection Report Requirements and What to Expect
- SB 721 Inspection Repair Requirements: Understanding Your Obligations
- SB 721 vs SB 326 Inspections: Key Differences and Scope
- Prioritizing Findings by Severity and Planning Repairs
- Preparing Your Community for an SB 721 Inspection
- Conclusion
Last Updated: October 16, 2026
What SB 721 Requires and Which Buildings Are Covered
California’s SB 721 law mandates safety inspections of exterior elevated elements on wood-framed multifamily buildings with three or more units that have balconies, decks, walkways, stairs, or similar elements, with inspectors evaluating structural issues SB 721 requires to be corrected.
Properties constructed before January 1, 2008 must complete their first inspection by January 1, 2025, then be re-inspected every six years. Newer buildings have different first-inspection timelines, but the six-year cycle applies once the first inspection is complete.
SB 721 targets wood-framed construction because wood deteriorates faster than concrete or steel. It focuses on the connections between exterior elevated elements and the main building framing, the joints and fasteners holding these structures in place.
This isn’t optional: failure to complete inspections on schedule can result in fines and legal liability. Inspections must be conducted by a qualified inspector, typically a licensed structural engineer or architect experienced in wood-frame inspection.
Common Structural Issues Found in SB 721 Inspections
Inspectors evaluate exterior elevated elements against a consistent set of failure patterns. Below are the most common findings in wood-framed multifamily construction, with how each presents, what causes it, and the practical response.
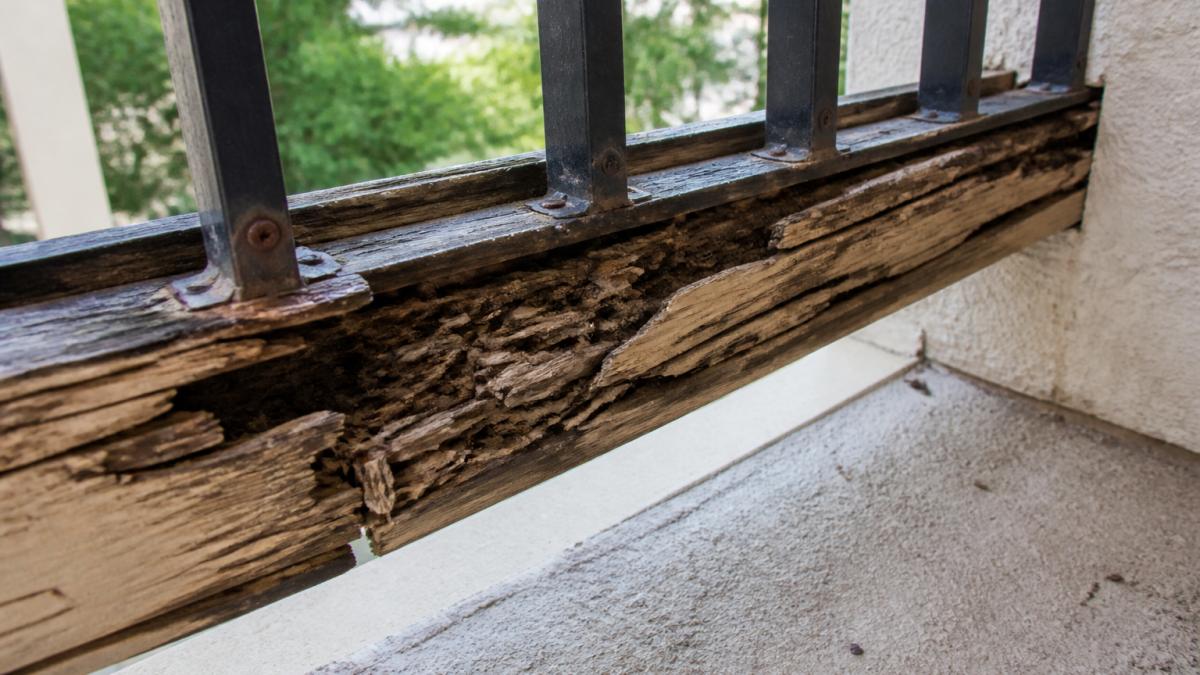
Wood Rot and Decay
How it appears: Soft, spongy, or crumbly wood; dark staining or bleached, fibrous texture; bubbling or flaking paint; a hollow sound when tapped; and fungal growth. Inspectors probe suspect members with an awl or screwdriver, if the tool sinks in easily, the member has lost section.
Why it matters: Decay fungi consume the cellulose and lignin that give wood its strength, so a member can look intact while the interior is largely gone. Because these elements rely on the full cross-section of each joist, ledger, or beam, even localized rot at a connection can dramatically reduce capacity.
Where it concentrates: Ledger-to-rim connections, joist ends embedded near the building, the top of guardrail posts, the bottom of stair stringers, and any horizontal surface where water sits. These are the first places an experienced inspector probes.
Typical response: Remove and replace decayed members; treat or replace adjacent wood showing early decay; correct the moisture source before rebuilding. Cosmetic patching over rot is not a repair.
Water Intrusion and Moisture Damage
How it appears: Water staining on soffits or ceilings below a deck; efflorescence; rust streaks from fasteners; peeling paint; musty odors; and damp sheathing found during invasive testing. Inspectors also look for failed flashing, open joints, deteriorated sealant, and drainage sloping toward the building.
Why it matters: Water is the root cause of most findings on this list, it drives decay, corrodes fasteners, and degrades sealants. Moisture trapped inside an assembly can persist for years before becoming visible, which is why invasive testing (small exploratory openings at suspect locations) is sometimes the only way to confirm the extent of damage.
Where it concentrates: Deck-to-wall intersections, around door thresholds, at post bases, beneath railings, and at any penetration through the waterproofing layer.
Typical response: Repair or replace flashing and waterproofing, restore positive drainage, replace damaged sheathing or framing, and re-seal penetrations. The moisture source must be corrected or the repair will fail again.
Loose, Corroded, or Improper Structural Connections
How it appears: Gaps between connected members; rust or white corrosion product on fasteners; bolts that turn freely or lack nuts and washers; nails or screws pulled through wood; split wood around fasteners; and ledger boards separated from the rim joist. Inspectors check every visible connection and may remove finishes to expose concealed hardware.
Why it matters: Connections transfer the load of the balcony, deck, or walkway to the building frame. A loose, under-strength, or corroded connection can fail suddenly rather than gradually, the defect category most directly associated with catastrophic collapses.
Where it concentrates: Ledger-to-rim attachments, joist hangers, post-to-beam connections, and guardrail post-to-framing attachments.
Typical response: Replace corroded or undersized fasteners with hardware rated for the exposure and load; add fasteners where the connection is inadequate; repair or replace split wood; and verify the connection meets current code. Repairs often require a permit and inspection.
Guardrail and Railing Instability
How it appears: Railings that move or deflect when pushed; loose balusters or pickets; cracked rails and posts; missing fasteners; corrosion at post bases; and railings below required height or with oversized openings. Inspectors apply force to test stability and check post attachments.
Why it matters: Guardrails are a life-safety system, a railing that fails under a person’s weight can cause a fall from height. Railing defects are among the most common findings and the most urgent to correct.
Where it concentrates: Post-to-framing connections, post bases at the deck surface, and any location where the railing has been modified or replaced without matching the original attachment detail.
Typical response: Re-secure or replace posts and connections; replace damaged members; and bring the railing into compliance with current height and strength requirements. In the interim, restrict access to the affected area if the railing is unsafe.
Cracks, Deflection, and Structural Movement
How it appears: Diagonal or horizontal cracks in wood members; visible sagging or deflection of a deck or walkway; gaps at connections; and doors or gates that no longer operate smoothly because the structure has moved. Inspectors look for patterns indicating overloading, settlement, or a failing connection.
Why it matters: Cracks and deflection are often symptoms of an underlying problem, rot, a loose connection, or inadequate original construction. Treating the crack without addressing the cause leads to recurrence.
Where it concentrates: Mid-span of joists and beams, at notches and holes cut for utilities, and at connections where concentrated forces are transferred.
Typical response: Investigate the cause, repair or reinforce the member, and correct the underlying condition. Significant deflection or cracking may warrant a structural engineer’s evaluation.
Corrosion of Metal Components
How it appears: Rust on fasteners, hangers, and post bases; white or gray corrosion product on galvanized or aluminum components; and pitting or section loss on structural hardware. Inspectors focus on connections and post bases where water and salt accumulate.
Why it matters: Corrosion reduces the capacity of the hardware holding the structure together. In coastal or high-moisture environments it progresses quickly and is often the first sign a connection is failing.
Where it concentrates: Post bases, ledger fasteners, joist hangers, and any hardware in contact with treated wood or exposed to weather.
Typical response: Replace corroded hardware with the correct type and rating for the exposure; correct the moisture source; and verify that dissimilar metals are isolated to prevent galvanic corrosion.
Takeaway: Most SB 721 findings trace back to water. Fixing the moisture source, flashing, drainage, sealants, and detailing, is what prevents the same defects from returning after repair.
How Findings Are Prioritized
Not every finding carries the same urgency. Inspectors and engineers typically sort findings into three tiers:
- Immediate life-safety hazard: A condition that presents an imminent risk of collapse or fall, severely decayed structural members, a railing that fails under load, or a connection that is actively separating. Restrict access and repair immediately.
- Repair-required condition: A significant defect that will worsen and become a hazard if left, extensive rot, multiple loose fasteners, or active water intrusion. Schedule repair promptly.
- Maintenance or monitoring item: A minor or early-stage condition that should be tracked and addressed in the normal maintenance cycle, small sealant gaps, early staining, or a single loose fastener in a non-critical location.
When you receive a report, confirm that each finding is assigned a severity and a recommended action. If it isn’t, ask the inspector to clarify before you plan repairs.
Root Causes and Prevention
Recurring defects almost always share a few root causes: water not directed away from the structure, omitted or incorrectly installed flashing, sealants past their service life, undersized or wrong hardware at connections, and maintenance programs that skip periodic inspection between required inspections.
A practical prevention program includes:
- Clearing debris from drains, scuppers, and gutters at least twice a year.
- Inspecting and renewing sealant joints on a defined cycle.
- Checking flashing at deck-to-wall and door thresholds after any repair or modification.
- Keeping a log of repairs, including photos and the hardware used.
- Walking exterior elevated elements annually and documenting conditions.
These practices don’t replace the required inspection, but they reduce the severity of what the inspection finds and extend the life of repairs.
Repair Verification and Documentation
After repairs, keep a record tying each finding to its resolution: the original finding and photo, scope of work, contractor and license information, permits and inspection approvals, product and hardware specifications, and post-repair photos. For significant structural repairs, a follow-up evaluation by the qualified inspector can confirm the work addressed the finding. Retain these records, they demonstrate compliance and inform future maintenance planning.
SB 721 Balcony Inspection Checklist: What Inspectors Look For
A thorough SB 721 balcony inspection follows a systematic process. Understanding what inspectors examine helps property managers prepare and ensures nothing gets missed.
Visual inspection of the balcony structure:
- Check for visible rot, cracks, or splintering in wood members
- Look for water stains, discoloration, or peeling paint
- Examine all fasteners for rust, corrosion, or missing bolts
- Assess the condition of railings and balusters
- Check for gaps between members or separation at connections
Examination of connections:
- Inspect where the balcony attaches to the building frame
- Look for loose fasteners or fasteners that have pulled through wood
- Check for corrosion or deterioration at connection points
- Verify that connections are properly installed and complete
Water management assessment:
- Review drainage patterns and identify areas where water pools
- Check flashing condition and look for gaps or deterioration
- Examine caulking and sealants for cracks or missing material
- Assess the overall waterproofing of the structure
Load-bearing capacity evaluation:
- Test the stability of railings and handrails
- Assess whether wood members show signs of overloading
- Check for deflection or movement in the structure
- Evaluate whether the structure appears capable of supporting its intended use
Documentation:
- Photograph all defects and problem areas
- Record measurements and locations of issues
- Note the severity and extent of each finding
- Document any areas requiring further investigation
SB 721 Inspection Report Requirements and What to Expect
After the inspection, the qualified inspector prepares a written report that becomes the official record of the building’s condition and the basis for required repairs. Because it drives repair scopes, contractor bids, and compliance documentation, know what a complete deliverable should contain.
What a Complete Report Should Contain
A well-prepared report typically includes the following elements. Use this as a checklist when you receive yours.
1. Building and scope identification
- Property address and building description (construction type, number of units, stories).
- A clear statement of which exterior elevated elements were inspected, each balcony, deck, walkway, stair, and guardrail, with locations identified so findings can be tied to specific units or common areas.
- The date of inspection and the date the report was issued.
2. Inspector credentials
- Name, license or registration number, and discipline (for example, licensed structural engineer or architect).
- A statement of the inspector’s qualifications and experience relevant to wood-frame exterior elevated elements.
3. Findings, organized by element
- A description of each defect observed, in plain language.
- The location of each finding, referenced to the element and, where possible, to a unit or common-area designation.
- The severity classification assigned to each finding.
- A statement of whether the condition presents an immediate threat to safety.
4. Photographic documentation
- Photos that clearly show each defect, with enough context to locate it.
- Photos of concealed conditions discovered during invasive testing.
- Where useful, photos taken before and after exploratory openings are closed.
5. Recommendations
- Specific recommended actions for each finding, repair, further investigation, or monitoring.
- A suggested timeframe or priority for each recommendation.
- A note where a finding requires evaluation by a structural engineer or other specialist.
6. Limitations and methodology
- A description of the inspection methods used (visual, probing, invasive testing) and any areas that could not be accessed.
- A statement of the inherent limitations of the inspection, for example, that concealed conditions may exist beyond what was observed.
7. Certification and signature
- The inspector’s signature and the date, certifying the report.
Tip: If your report doesn’t identify the location of each finding, assign a severity, or include photos, ask the inspector to supplement it before you solicit repair bids. A vague report makes it difficult to compare contractor proposals or demonstrate compliance.
How to Evaluate a Report You Receive
A few practical checks confirm the deliverable is complete and usable:
- Can you match every finding to a location? If not, ask for a marked-up plan or unit-by-unit list.
- Is every finding assigned a severity and a recommended action? Findings without a priority are hard to schedule and budget.
- Are photos clear and labeled? You should be able to see the defect and understand where it is.
- Are immediate safety threats called out separately? These need to be addressed before other work is planned.
- Are inaccessible areas disclosed? If the inspector couldn’t reach an area, the report should say so and recommend how to address it.
Typical Timeline and Next Steps
Property managers commonly receive the report within two to four weeks, depending on property size and the extent of invasive testing. Once you have it:
- Review the findings and confirm the severity classifications.
- Separate immediate safety items from scheduled repairs.
- Obtain bids from qualified contractors for the repair scopes.
- Confirm whether any repairs require permits and inspections.
- Communicate the findings and planned work to residents and the board.
- File the report and all repair documentation for the next inspection cycle.
Records to Retain
Keep the inspection report, repair scopes, contractor bids and invoices, permits and inspection approvals, product and hardware specifications, and before-and-after photos. These records demonstrate compliance, support future inspections, help the next inspector understand the building’s history, and show that identified conditions were addressed in a timely manner.
SB 721 Inspection Repair Requirements: Understanding Your Obligations
Once an inspection is complete, the property owner has legal obligations to address the findings. The law requires structural issues SB 721 identifies be corrected within a specific timeframe based on severity.
Immediate safety threats must be addressed right away. If an inspector identifies a condition that presents an imminent risk of collapse or serious injury, the property owner must take action immediately.
Other structural defects must be repaired within a reasonable timeframe. The law doesn’t specify an exact deadline for non-emergency repairs, but delaying them increases liability exposure and allows problems to worsen.
Repairs must be made by qualified contractors and bring the structure into compliance with current building code standards. This often goes beyond fixing the immediate problem, the entire connection or structural system may need upgrading.
Documentation of repairs is important: keep records of what was done, who did it, and when. Some repairs require building permits and inspections to verify code compliance.
SB 721 vs SB 326 Inspections: Key Differences and Scope
Many property managers confuse SB 721 and SB 326. Both address safety in multifamily buildings, but they cover different systems and requirements.
SB 326 focuses on elevator safety, requiring annual inspections of elevators and other vertical transportation systems in multifamily buildings with four or more units.
SB 721 focuses on exterior elevated elements like balconies and decks. It applies to wood-framed buildings with three or more units constructed before January 1, 2008.
Both laws can apply to the same building. A property manager may need to coordinate separate inspections and track separate compliance deadlines, though some qualified inspectors can address both in coordinated site visits.
Knowing which law applies to your property is essential, mixing up requirements or missing a deadline for either inspection can result in fines and liability.
Prioritizing Findings by Severity and Planning Repairs
Not every finding in an SB 721 inspection report carries the same urgency. Prioritizing helps property managers allocate resources and address the most critical issues first.
Severity Level 1 (Immediate): Findings presenting an imminent risk of collapse, structural failure, or serious injury, severely rotted structural members, completely loose railings, or actively failing connections.
Severity Level 2 (High Priority): Significant structural defects that will worsen rapidly if ignored, extensive rot, multiple loose fasteners, or water intrusion actively damaging the structure.
Severity Level 3 (Moderate Priority): Structural issues needing attention but not immediately dangerous, minor rot in non-critical areas, isolated loose fasteners, or early-stage water intrusion. Schedule these into the property’s maintenance plan.
Severity Level 4 (Lower Priority): Maintenance items or minor defects to monitor, cosmetic damage, minor caulking gaps, or areas needing further investigation before repair is planned.
Planning repairs by severity lets property managers manage costs and avoid emergencies. Addressing high-priority items prevents them from becoming emergency repairs that cost far more and disrupt residents.
Preparing Your Community for an SB 721 Inspection
Successful SB 721 inspections require coordination and preparation: communicate with residents, ensure access to all areas, and organize documentation before inspection day.
Notify residents in advance. Tell homeowners when the inspection will occur, what areas are affected, and what to expect.
Clear access to all balconies and decks. Inspectors need full access to every exterior elevated element.
Organize building documentation. Gather original construction documents, previous inspection reports, repair records, and any modifications to exterior elements.
Preparation doesn’t prevent defects from being found, but it makes the inspection efficient and the findings clearly documented.
Understanding the structural issues that inspectors look for during SB 721 inspections helps property managers and board members prepare for the process and act on findings. Get a quote from Apex Reserve Study to learn how we can help your community navigate SB 721 compliance while maintaining strong financial planning.
| Finding Category | Severity Indicator | Typical Repair Timeline |
|---|---|---|
| Structural member collapse risk | Immediate | Days to weeks |
| Extensive wood rot or corrosion | High priority | Weeks to months |
| Loose connections or fasteners | Moderate priority | Months |
| Minor water intrusion or caulking gaps | Lower priority | Months to annual cycle |
EXTERNAL CITATIONS:
For specific guidance on inspection timelines and building coverage, consult the California Department of Housing and Community Development resources on SB 721 compliance.
Property managers should also review the American Society of Civil Engineers guidance on wood-frame inspection standards to understand industry best practices for identifying structural defects.
Frequently Asked Questions
What are the most common structural problems found during an SB 721 inspection?
SB 721 inspections typically identify wood rot, water intrusion, moisture damage, loose structural connections, and guardrail stability issues. Wood rot occurs when water penetrates framing and fasteners, compromising load-bearing capacity. Water intrusion and drainage failures allow moisture to accumulate, accelerating deterioration. Loose connections between exterior elevated elements and building framing create collapse risk. Wobbly or improperly secured railings fail to meet safety standards. These defects pose life-safety risks and must be documented in the inspection report for corrective action.
How do SB 721 and SB 326 inspections differ in scope?
SB 721 applies to multifamily dwellings with wood-framed balconies, decks, and exterior elevated elements, requiring visual and invasive testing of structural components and connections. SB 326 focuses on elevator safety in residential buildings. SB 721 inspections examine waterproofing, drainage, fastener integrity, and structural stability of exterior elements. SB 326 inspections assess elevator mechanical and safety systems. Properties may need both inspections depending on their features and age.
What should be included in an SB 721 inspection report?
A complete SB 721 inspection report documents findings for each exterior elevated element, identifies structural defects and safety hazards, rates severity levels, specifies repair requirements, and outlines the corrective work timeline. The report should include photographs, condition assessments, moisture test results, fastener evaluations, and recommendations for waterproofing and drainage improvements. It must clearly communicate which findings pose immediate life-safety risks and which can be addressed during planned maintenance. A well-written report helps boards prioritize repairs and communicate findings to homeowners.
What repair requirements follow an SB 721 inspection finding?
SB 721 requires property owners to address all identified structural defects and safety hazards within specified timeframes based on severity. Dangerous conditions must be corrected immediately or the element must be closed to occupants. Non-critical repairs typically must be completed within one year. Repairs require permits and must comply with current building codes. After corrective work, verification documentation and post-repair inspection may be required. Property managers should budget for repairs in reserve funding and coordinate with the qualified inspector to confirm compliance.
Need a Reserve Study?
Get a free quote for your California HOA or condo association. We respond within 1 business day.
Get Your Free Quote